
Overview
SCO Settings is where you set up self checkout (SCO) lanes from the back office: the menu buttons customers tap, the pictures they see, and how the lane behaves. It opens when you start the SCO menu tool. Everything you set is sent to the lanes from here; lane staff can no longer change these settings on the lane.
The usual order of work for a store:
- Retrieve the current settings from one lane, so you start from what the store already runs.
- Build the menus (Fruit & Veg, Bakery and so on) and add their items.
- Add pictures to the menu items, and set the logo, wait and lock screens.
- Put the menus on buttons 1 to 5.
- Check the other settings on each tab.
- Save, then send to the lanes, and send the menu pictures if they've changed.
The settings are one set for the whole store: every lane you send to gets the same buttons and settings.
Lanes need the POS version that reads the new SCO settings file. Older lanes ignore what this screen sends.
Menus
The Menus list on the left shows every SCO menu and how many items it shows on the lane. Menus the store already had (Fruit & Veg, Bakery, Heavy Bulk) appear here automatically the first time.
| To | Do this |
|---|---|
| Make a new menu | Click Add menu, type its name, add items (next section), then click SAVE. |
| Change a menu | Select it and click Edit, or double-click it. |
| Rename a menu | Open it with Edit, change the name, then SAVE. Any button using it updates to the new name. |
| Delete a menu | Select it and click Delete. You can't delete a menu a button is using; take it off the button first. |
In the menu builder, SAVE keeps your changes and leaves the builder open. CLOSE asks whether to save anything unsaved, then closes it.
Keep menu names short: the name is the button text on the lane, and about 20 characters fit.
Adding items to a menu
Pick a department, sub department or search, then add the whole list or just the items you select.
Find the items
- Items By Departments or Items By SubDepartments lists them, with how many items and active items each has.
- Filter the list: type in the box above it. Only departments whose name or number contains what you type stay.
- Jump in the list: click in it and type. F goes to the first department starting with F; F again goes to the next one. Type FR quickly to go straight to FROZEN. Press Down or Enter in the filter box to move into the list.
- Items by Selection: type part of a description in the search box to find items by name.
Click a department or sub department to show its items on the right.
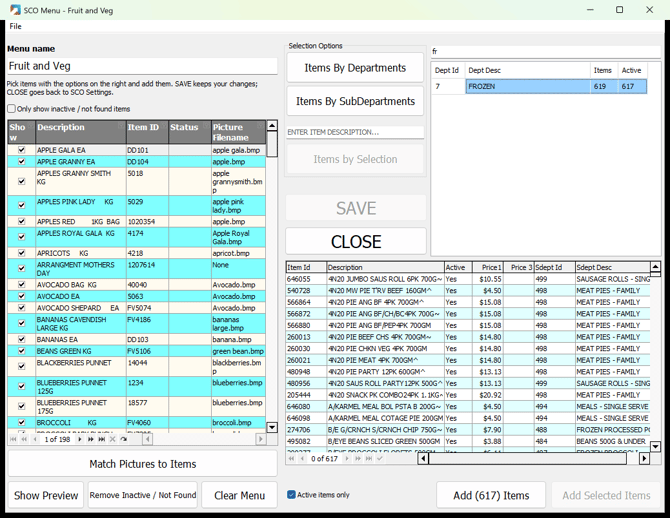
Typing "fr" filtered the department list to FROZEN; its 617 active items are listed below it.
Add them
- Active items only (ticked to start) hides inactive items from the list and from both Add buttons. Untick it if you really want inactive ones.
- Add Items adds every item in the list.
- Add Selected Items adds just the ones you pick. Hold Ctrl and click to pick several, or Shift and click to pick a run. The button shows how many you've picked, for example "Add (5) Selected".
- Click SAVE when you're done.
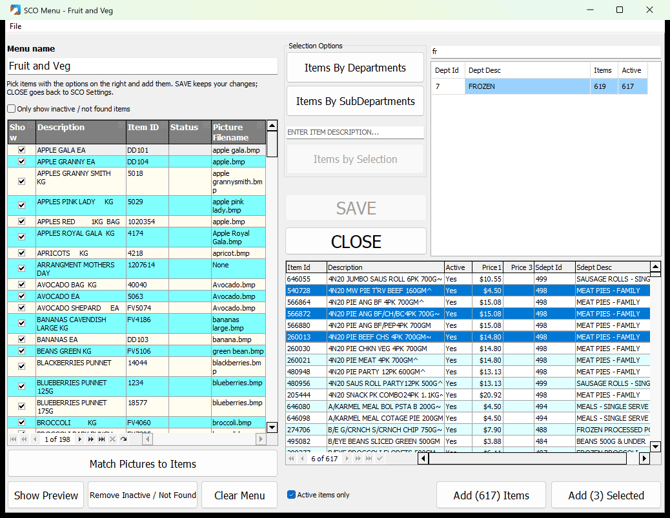
Three items picked with Ctrl-click: the button now reads "Add (3) Selected".
Tidy the menu
- Show ticks an item on or off the lane without removing it from the menu.
- Status flags items that are now Inactive or Not found in the item file.
- Only show inactive / not found items lists just those, so you can check them.
- Remove Inactive / Not Found takes them all out. SAVE keeps the change.
Preview it
Show Preview shows the menu as the lane will. The ALL button lists every item A to Z; 0-9 lists items whose name starts with a number, and is greyed out when there are none; the letter buttons (ABCD, EFGH and so on) show one group. More › and ‹ Back page through long lists. The preview opens on ABCD.
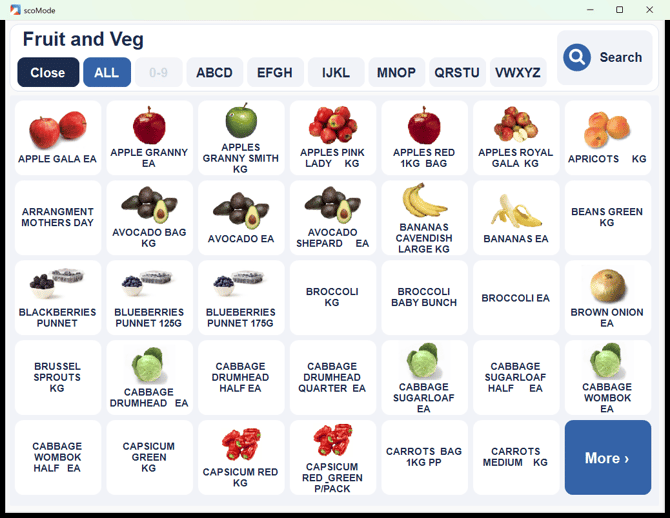
The preview on ALL, in the lane's look. Items without a picture show their name only.
Item pictures
Item pictures live in the posMenus\menuImages folder next to the back office program. Put the picture files there first (JPG, PNG, BMP or GIF).
Match pictures to items automatically
In the menu builder, click Match Pictures to Items. It looks for a picture for every item that hasn't got one.
- A picture matches when every word of its file name is in the item's description. So apple pink lady.jpg suits APPLES PINK LADY KG.
- Plurals, sizes and words like KG, EA and EACH are ignored.
- Close matches start ticked and partial matches unticked. Check the list, tick or untick, and accept.
- Click SAVE to keep them.
Name picture files after the product ("banana.jpg", "granny smith apple.jpg") and matching does most of the work.
To set or clear one item's picture by hand, right-click the item and use Add Image File or Clear Image Detail.
Send the pictures to the lanes
Pictures go to the lanes separately from the settings, because there can be hundreds and they rarely change.
- On SCO Settings, tick the lanes under Send to.
- Click Send menu pictures.
- It lists any pictures the menus use that aren't in the back office folder. Add them, or carry on without them.
- Confirm to send.
It sends only the pictures used by items shown on the menus that are on buttons. Send them again whenever you add or change pictures.
Screen pictures
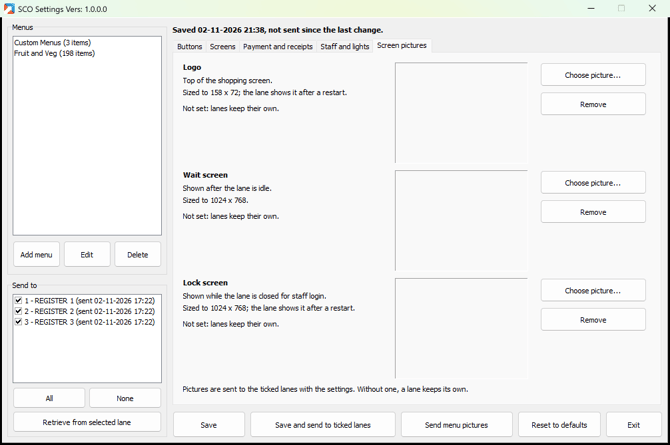
The Screen pictures tab sets the store's own logo, wait screen and lock screen. Pick any picture and the tool resizes it to fit, so you don't need to prepare it.
| Picture | Where the lane shows it | Size it's fitted to | Takes effect |
|---|---|---|---|
| Logo | Top of the shopping screen | 158 x 72 | When SCO mode next starts |
| Wait screen | After the lane has been idle | 1024 x 768 | The next time it shows |
| Lock screen | While the lane is closed for staff login | 1024 x 768 | When SCO mode next starts |
- Choose picture... picks a file. It's fitted inside the size without stretching, and any space around it is filled with the colour of the picture's top-left corner.
- Remove clears it. A picture that isn't set isn't sent, so lanes keep the one they have.
- Screen pictures go to the lanes with the settings when you Save and send.
Buttons
The Buttons tab puts up to five menus on the lane's menu buttons. They show in order 1 to 5 as text buttons, on portrait and landscape lanes alike; button pictures are no longer used.
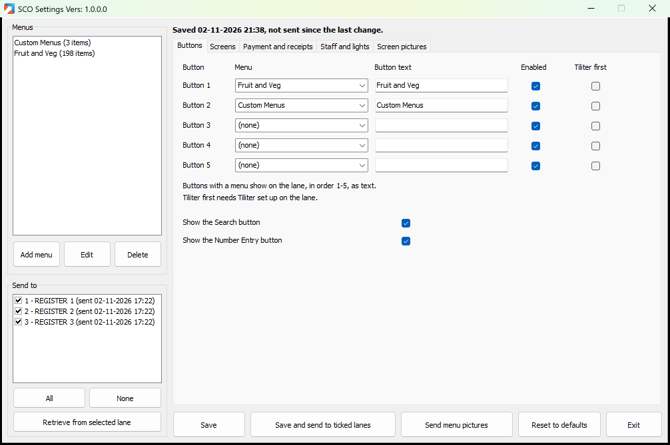
SCO Settings: menus on the left, the lanes to send to below them, and the tabs on the right.
For each button:
| Column | What it does |
|---|---|
| Menu | The menu behind the button. Leave it as (none) to hide the button. |
| Button text | Fills in from the menu name. Change it if the button should read differently. |
| Enabled | Untick to hide the button for now, keeping its menu and text. |
| Tiliter first | The lane tries the Tiliter camera to recognise the produce first, then shows the menu. Only tick it on stores with Tiliter set up. |
Below the buttons, Show the Search button and Show the Number Entry button turn those two buttons on or off.
A button can't use a menu with no items: Send refuses, because the lane would wait for it.
The settings tabs
Most settings take effect on the lane between customers after you send them. Those marked (on restart) wait until the POS next starts.
Screens
| Setting | Default | Notes |
|---|---|---|
| Force the portrait layout (on restart) | Off | Normally the lane works it out from its screen. |
| Idle time before the wait screen (seconds) | 300 | At least 30. |
| Wait screen text | Please Touch Anywhere or Scan Item to Start.... | |
| Wait screen text size | 25 | 10 to 120. |
| Wait text position | middle | top, middle, bottom, or a number 1 to 99 for that percentage down the screen. |
| Prompt at the start of a sale | Scan your first item to begin | |
| Open department item number | blank | The item behind the open-department button. Blank hides the button. It must be in the item file. |
| Silence SCO sounds | Off | |
| Stop message on a bad scan | On |
Payment and receipts
| Setting | Default | Notes |
|---|---|---|
| Card-only lane | On | |
| Show the card-only warning | On | |
| Skip the card-only prompt | Off | |
| Block payment when the printer is out of paper | On | |
| No receipt by default | Till's setting | Yes or No sets it for SCO; Till's setting leaves the lane's own value. |
| Ask whether the customer wants a receipt | Till's setting | As above. |
| Receipt prompt timeout (seconds, 0 = none) | 0 | How long the receipt question waits. |
| Item limit per sale (0 = no limit) | 0 | Staff can override it. |
| Ask "Need more time?" after (seconds, 0 = off) | 180 | Abandoned sales: how long a sale with items can sit untouched before the lane asks. 0 turns it off; otherwise at least 30. The customer then has 60 seconds to answer. |
| If nobody answers | assist | assist calls staff, suspend puts the sale aside for staff to recall, void cancels it. If payment has started, the lane always calls staff. |
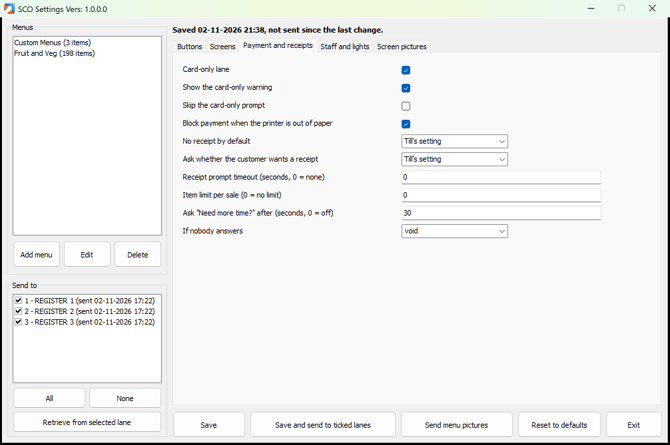
The Payment and receipts tab, from a test store: its abandoned sales settings are 30 seconds and void, not the defaults.
Staff and lights
| Setting | Default | Notes |
|---|---|---|
| Minimum cashier level for the staff menu | 1 | Also covers the last-receipt pop-up. |
| Lane light driver | None | See below. |
| Light program or OPOS device | blank | For extProg or oposLights only. |
| Light commands: off, red, green, blue, white | blank | For extProg only: the command for each colour. |
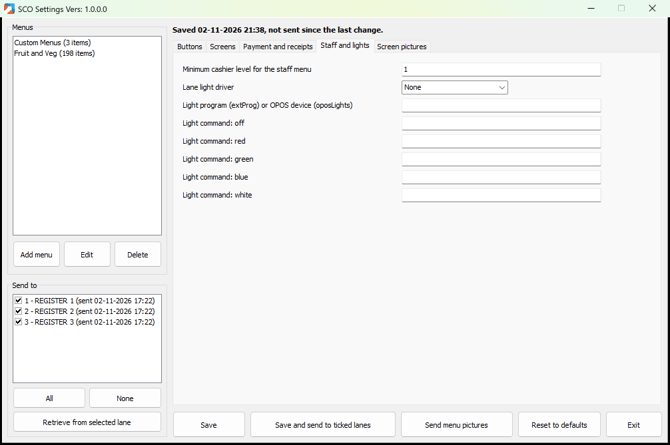
Light drivers:
- None: no lane light.
- kuandoLights: a Kuando light. Nothing else to fill in; the lane uses the Kuando service's own colours.
- oposLights: an OPOS light. Fill in the OPOS device name.
- extProg: a light driven by a program on the lane. Fill in the program and the command for each colour.
Light settings depend on each lane's hardware. If you send them to several lanes, the tool asks you to check they all have the same light.
Reset to defaults puts the Screens, Payment and Lights settings back to the defaults above. It doesn't change the buttons or menus.
Retrieving settings from a lane
Retrieve from selected lane copies a lane's current SCO settings onto the screen, so you can start from what the store already runs instead of the defaults.
- In the Send to list, click the lane's name to highlight it. Its tick doesn't matter.
- Click Retrieve from selected lane. If you have unsaved changes, it asks before replacing them.
- Read the message it shows: it says where the settings came from and lists anything to check.
- Look over each tab, change what you need, then click Save.
What to expect:
- Settings the lane doesn't have come in at their defaults, as that's what the lane uses. On an older lane, this usually includes Block payment when the printer is out of paper (On) and the abandoned sales settings.
- The two receipt settings come in as Yes or No, not Till's setting.
- The menu buttons only change if the lane already has buttons set from this screen. An older lane hasn't, so your buttons stay as they are.
- Anything the screen can't show is listed: an unknown light driver, a menu the back office doesn't have, or a value that isn't valid. Fix those before you send.
- If the lane is off or can't be reached, it says so and changes nothing.
As one set of settings goes to every lane, retrieve from a lane you know is set up correctly.
Saving and sending
Nothing reaches the lanes until you send. The line at the top of the screen tells you where you are: Unsaved changes, Saved but not sent since the last change, or Saved and sent with the date and time.
- Save keeps your settings in the back office without sending them.
- Save and send to ticked lanes saves, checks everything, then sends to the lanes ticked under Send to. All and None tick or untick every lane. Each lane shows when it was last sent.
- Send menu pictures sends item pictures only (see Item pictures).
- Exit asks to save any unsaved changes. If the settings, or a menu on a button, changed since the last send, it offers to send them.
The Send to list shows the store's active self checkout lanes that have an IP address set.
What a send includes
- The menu for each button, built fresh from the menus in the back office.
- The logo, wait and lock screen pictures that are set.
- The settings file, last.
When the lane picks it up
The lane takes in new settings between customers, never during a sale: after a sale, when the wait screen shows, when a customer touches the screen, or within a minute while it sits idle. A lane in normal till mode picks them up in its usual data refresh.
After a send, check a lane: the new buttons and settings should show before the next customer.
Troubleshooting
| You see or notice | What it means | What to do |
|---|---|---|
| "Button N uses …, which has no items" | The menu on that button is empty. | Add items to the menu, or pick another menu for the button. |
| "Button N's menu no longer exists" | The menu was deleted. | Pick another menu for the button. |
| "Open department item … is not in the item file" | The item number is wrong for this store. | Correct it, or clear it to hide the button. |
| "… must be 0 (off) or at least 30 seconds" | The abandoned sales time is too short. | Use 0 or 30 and above. |
| "Light settings are specific to each lane's hardware" | You're sending lights to several lanes. | Send anyway if every lane has the same light, or tick one lane at a time. |
| "… is not answering" when retrieving | The lane is off or off the network. | Check the lane is on and try again. |
| "… isn't a choice here" after retrieving | The lane has a value this screen doesn't know. | Pick a value from the list before you send. |
| Pictures missing on the lane's menu | The pictures weren't sent, or aren't in the back office folder. | Add them to posMenus\menuImages and click Send menu pictures. |
| Lane still shows the old buttons | It hasn't been between customers yet, or it's on an older POS version. | Finish or clear the current sale and wait a minute. If it still doesn't change, check the lane's POS version. |
| Delete is refused for a menu | A button uses it. | Take it off the button on the Buttons tab, then delete it. |