There are 2 parts to this article:
Understanding "Send Prices to Tills"
The "Send Prices to Tills" tool is used to send item updates—such as price changes or new product entries—to your registers, ensuring they scan correctly at the point of sale.
You'll see several sending options; select the option that matches your changes to ensure updates are applied as expected.
Steps to Use the "Send Prices to Tills" Tool
Step 1
Make sure there are pending till changes ready to send. You can check this at any time in the status bar at the bottom of Convenience.

Step 2
Choose one of the following ways to open Send Prices to Tills:
A. Go to the Inventory tab in Convenience, then select Send Prices to Tills from the menu.
B. Double-click the pending item changes in the status bar at the bottom of the screen.

When the window opens, you'll have a range of options for how and what to send to the registers:
1. Send Type
Choose how updates are sent to your registers using the Send Type drop-down:
| Option | Description |
|---|---|
| All Changes | Sends all pending item changes to the registers. |
| Host Changes | Sends only changes related to host-managed items. |
| Store Changes | Sends only changes entered at the store level. |
| Previous Sends to Registers | Re-send a previous batch of updates from the drop-down below. (See Below) |
| Initial Load | Sends every item currently in the system to the registers (requires password; See below). ⚠️ Not supported on Linux sites |
| Active Items | Sends all active items in the system. Useful for full refreshes. |
📝 Reminder
The default send type is pre-selected. Double-check and update it if needed before sending to the tills.
Previous Sends to Registers Settings
When using Previous Sends to Registers, choose a previous send from the list below.
Select View to see the items included in that send.

Initial Load Settings
When using Initial Load, additional setting is available:
| Setting | Description |
|---|---|
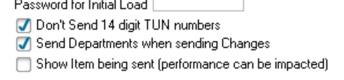
| Password | Required for Initial Load. Default for WinPOS is sure. |

2. Send Options
Enable these if required:
| Setting | Description |
|---|---|
| Don’t send 14-digit TUNs | Prevents TUN numbers from being sent (avoids accidental scans). |
| Send Departments | Ensures departments are sent with item changes. |
| Show item being sent | Shows the item number during the send. Helps identify if a specific item is causing issues. (Off by default) |
3. Filters
Use these to control what gets sent:
-
Department, Group, Supplier: Filter by category

4. Actions
-
Process: Sends selected changes to the tills
-
Resend Files: Retries the last send if it didn’t reach the till
-
Print: Generates a report of what will be sent
-
Exit: Closes the window

Step 3
Once you've made your selections, click Process to send the updates to the tills. The progress bar will go to 100% for each register

⚠️ Troubleshooting Issues
Register Stuck at 0%
If the register stays at 0% after sending, it’s likely online but may have a credential issue.
Try restarting the register and sending again. If the issue continues, contact Future Net Support for further help.

Register Not Responding (Red Text)
If you try to send to the tills and see red text next to a register, this usually indicates a network issue.
The register may be:
-
Powered off
-
Disconnected (loose or unplugged network cable)
-
Misconfiguration on the network
✅ What to check:
-
Ensure the register is turned on
-
Restart the register
-
Unplug and reconnect the network cable — at both ends
If the issue persists, contact Future Net Support for further guidance.

Comms Error Notification
When a register shows red during a send (like above), a comms error will appear in the status bar at the bottom of Convenience.
This alert notifies you when a send to a register has failed.
If you see the comms error count increasing after each send, follow the network checks above.
If the issue continues, contact Future Net Support for further assistance.

No Changes to Send – But You Know There Are
If you see a “There are no changes to be sent” message, even though you have pending till changes, follow these steps:
-
Check the Send Type
Make sure you've selected the correct option (e.g. Store Changes, Host Changes). -
Try ‘All Changes’
Switch to All Changes and attempt the send again to clear the pending item. -
Check the Item
Ensure the item has no data issues.
If you're still unable to send or need help, contact Future Net Support for assistance.
